I used
BoBunny Enchanted Garden paperline and accessories for this one - the 6 x 6 pad, the brads, the buttons, layered chipboard, the jewels, emphera pack.
Embossing powders Ranger Queens Gold Embossing Powder, Lindys Stamp Gang Terra Cotta Plum.
Stamps Impression Obsessions Cover a Card Quatrefoil, Papermania Postal Frame, Papermania Botanical Print, Bobunny It is Written, INDIGOBLU-Crackleglaze
Dies - Spellbinders Fancy Postage Stamp A 2 Card Creator, Spellbinders Botanical Swirls Die, Spellbinders Butterfly Magic Die, Cottage Cutz Small Confectionery Bag Die, Cottage Cutz Victorian Gate Die ,Spellbinders Country Charm dies, Spellbinders A2 Curve Border 1
Indigo Blu Gilding Flakes
Darice Pearls 10 mm Pearls and 8 mm pearls
Sprays Prima Color Bloom Gold Foil, Cotton Candy, Pearl White, Soft Teal
Ribbon Leaves Olive Green
Wires, jump rings and spacers from my stash
have fun

I used a cutapart from one of the pages, immediately thought this would do for the front door.
Had some ribbon olive leaves in my Design Kit and thought yea around the door.
I cut the shanks off of some of the brads and used silicone glue to attach to the front cover.
Bobunny’s gorgeous jewels for the base of the door made it pop.

Spine
wire binding with pearl drops
PAGE 1

Front page pocket with tabbed photo matt,
I cut out one of the smaller cutapaarts and mounted it on some chipboard
(love Gwen’s idea for this)
The binding started out as white cardstock and I then used Prima Color Bloom Soft Teal
Darice Pearls were used as part of the binding

top opening flap.
I loved the paper and thought it could stand on its own without a lot of embellishments
I used some of the layered chipboard accessories to hight aspects

close the flap and then open it from left to right
again wanted to leave the paper clean
(also I had used a lot of embellishments on other pages and it was getting rather bulking rofl)

reverse side, again a top flap
did I tell you I love this paper lol
side pocket with tabbed photo matt

waterfall flaps (again one of my favs)
I used three of the layered chipboard for the bottom
Each of the pockets have similar format.

used white embossing powder with Chandelier stamp

another pocket, with layered chipboard piece
these are gorgeous

love this cute little character on a pocket, of course, lol
I made an inside pocket with photo matt to go inside it

pockets again lol


adore this cutapart, decided to use it as a pocket so made a wee slit and used it for a tag

I used Prima Colour Blooms soft teal and cotton candy on white cardstock
the picture does not do it justice, it is soooo lovely, soft and shimmery looking


I loooove dies of any description and hauled out my spellbinders
on the left is Spellbinders Botanical Swirls Die, on the right is Spellbinders Butterfly Magic Die,

again a cutapart used as a belly band type pocket

more flaps added lol,

Cottage cuts confectionary die used for the pockets

One of my many favourites lol


on the left Rangers Gold embossing powder and Indigo Blu Crackleglaze
on the right used papermania Papermania Botanical Print,
tag I used Lindy’s Stamp Gang Terracotta Plum embossing powder with BoBunny It is Written stamps

Had to use my gilding flakes with quatrefoil stamp


Indigo Crackleglaze with Lindy’s Stamp Gang Terracotta Plum embossing powder
used Gold embossing powdere to give an edge to the photo matt
Tutorial can be found here
You can also use this method on chipboard:
I love all things ethereal so when I saw the KaiserCraft Enchanted Garden paper collection I had to use it, so when I used it lavishly on my Boxed Memories Album I still had leftovers woo hoo.
No waste in this household so had this lovely chipboard album to play with and decided it would go together beautifully.

Acetate front cover, and I fussy cut the fairy and toadstool and put it on the front.
The paper bundle has a lovely page of borders so enjoyed playing with them.
Wild Orchid Craft flowers were used for a wee touch on the front.
Peach 2 Tone Wild Roses, these are gorgeous and I also used Cherry Blossoms to tuck in the corners.
A couple of pages inside

There are some lovely tags in this bundle and I used one to make a pocket.
The top of the page I used a stamp from my stash and the Lindys embossing powder.
I had some paper cut outs in my stash that I trimmed (don’t like the white edges) for the hummingbird to feed off.
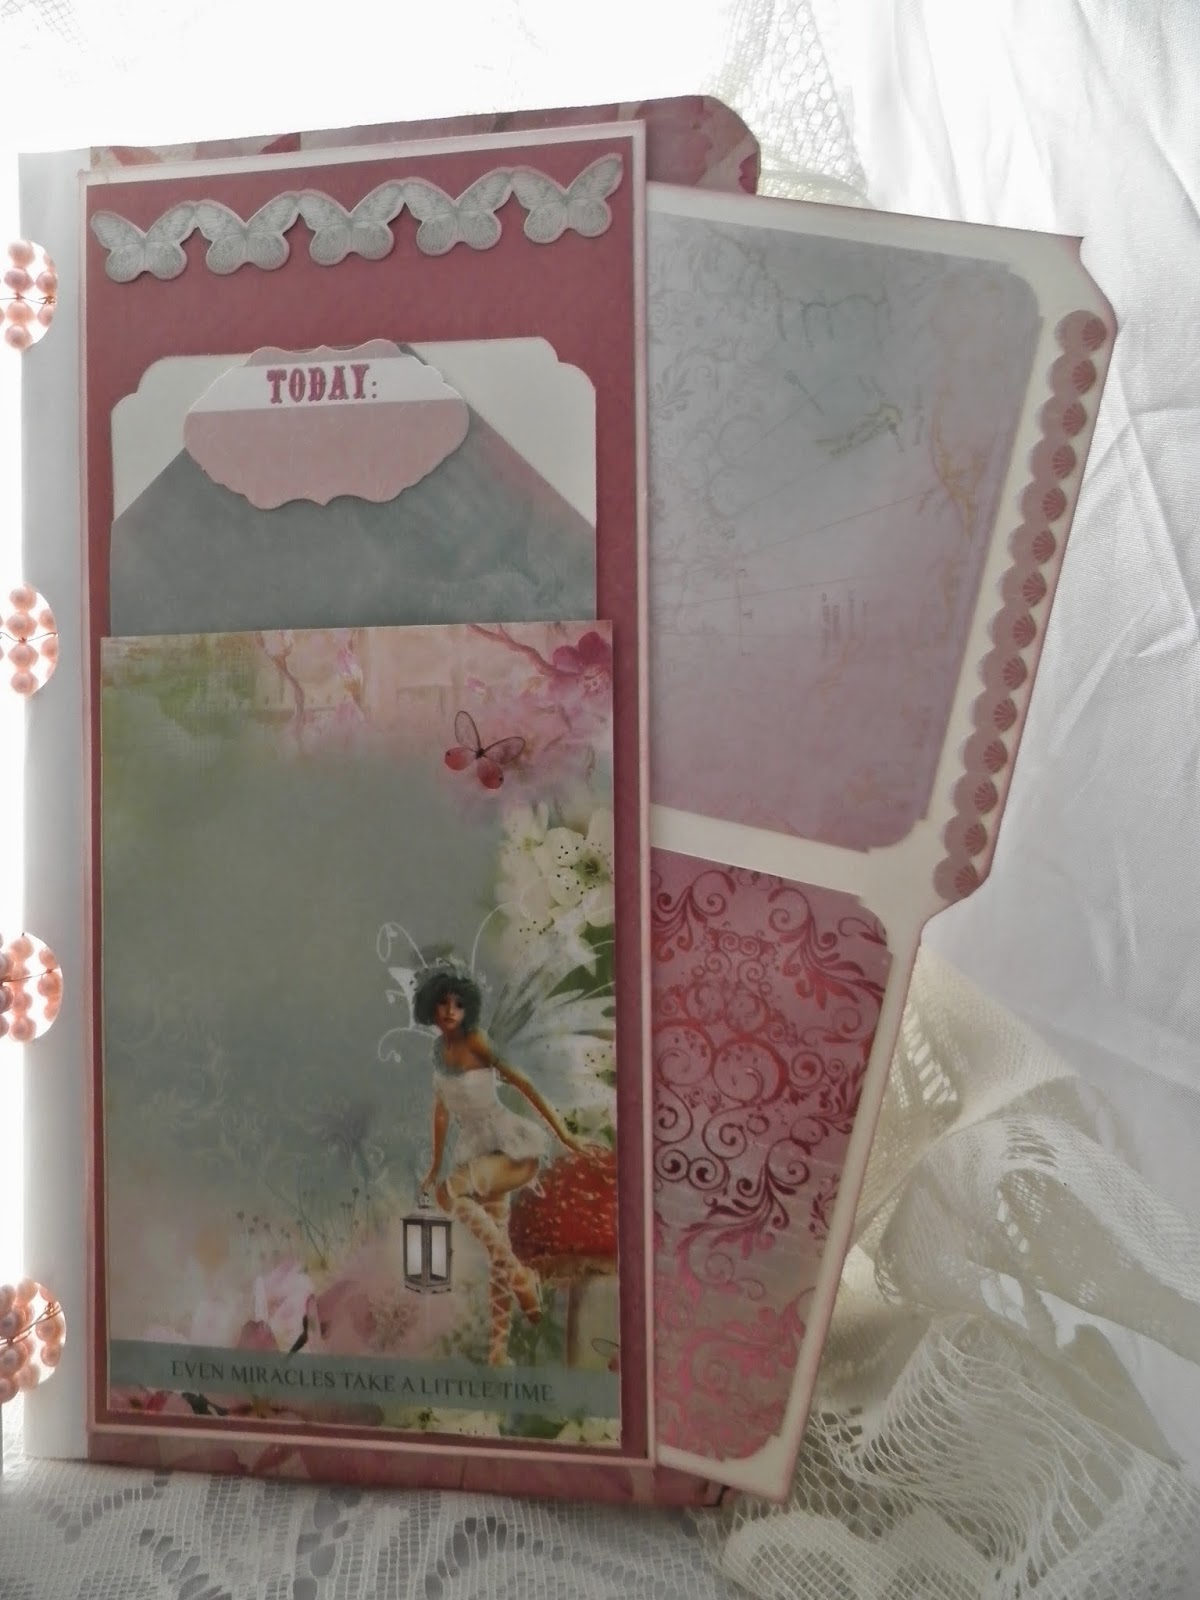
Stunning papers in the bundle, pocket on front of page and a tag tucked in behind the pocket at the side.
To finish the album, I used Gilders Paste to edge the album, of course! My fav, didn’t ya know rofl.


")


